 |
|

07-20-2018, 11:21 AM
|
|
|
|
Join Date: Apr 2013
Posts: 3,281
|
|
 Homemade Amphibious side by side (aatv)
Something a bit different than your average thread on here I thought Iíd share and update as I go along an amphibious all-terrain vehicle build Iíve been planning for the last few years. Planning is probably an understatement. Iíve spent hundreds of hours obsessively watching YouTube videos of those clever Russians and their big-tyred or tracked buggies going over all sorts of terrain and through swamps that would make your average Argo cringe. My wife thinks I have a real issue. Truth be told I probably have several issues, Iím just pretty good a hiding most of them from her better than I have this one...
So, why an aatv? The need came about from living in Fort McMurray. Thereís a million miles of cut lines up here but very little in the way of roads. You canít go more than a mile in any direction without hitting a Muskeg hole or Beaver pond. Iíve had a couple Argos over the years and while they can get you off the beaten path they are not the most comfortable mode of travel. Add to that fact they still get stuck pretty easy even with tracks and they are very high maintenance. I also went the jet boat way for the last 5 years and while I did enjoy getting on the water it didnít get you away from people. Lots of disposable income up here and every second house seems to have a jet boat in the driveway. So, I needed something different that not everyone had where I could get out where the critters roam free with not much worry from man.
I originally thought of building a buggy similar to the skid steer Sherp but with slightly less tall tires. Less tall being 52Ē tall as opposed to the 63Ē tall tires on the Sherp. Then I had the pleasure of driving one. While they are a very capable machine the herky-jerky skid steering brought back unfavourable memories of all the hours Iíve spent in an Argo. Plus, the drivetrain is pretty complicated and once things start to get a few hours on them I can see the maintenance being very similar to an Argo but with the added bonus of being super expensive. I suppose though, if you can afford the $140,000 price tag of a Sherp the maintenance costs probably donít matter much to you...
So, my plan is to build a conventional sxs style buggy with a front steering axle. It will be a complete custom with a front Dana60 Kingpin steer axle and another full floater D60 out back. 4:88 gears with Detroit lockers in both axles. Full hydro-steering. Mid mounted 4-cyl Ecotec with an automatic transaxle with a welded center differential turned 90 degrees from the way it sits stock in the 130,000 kilometer Cavalier itís coming out of. Front driveshaft going to a Samurai divorced transfer case although I donít think Iíll need the low gear all that often with the transaxle having a low first gear. No brakes on the axles but Iíll have one on each side of the transfer case up high and out of the slop. Steel square tube frame and all aluminum body. No suspension since the tires will soak up the bumps and Iím hoping to keep it under 2,500lbs all done so that it floats high in the water.
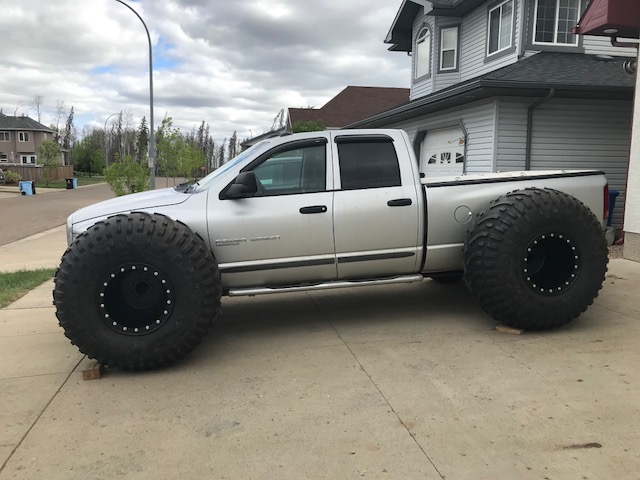
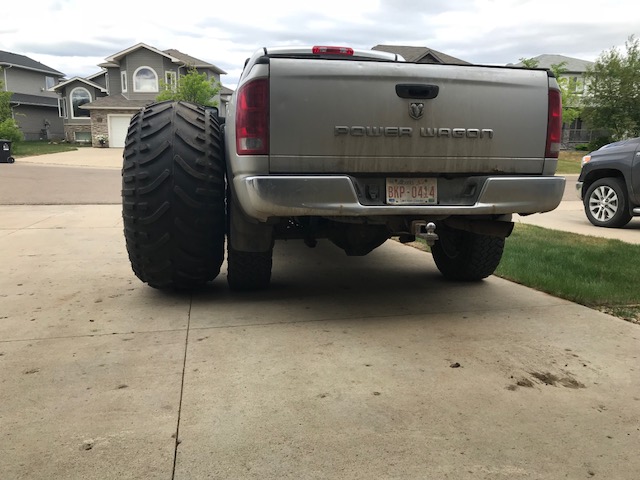
Below are the tires with 21Ē double beadlock wheels leaning up against my Powerwagon on 35ís. With 9 psi in them they measure out at 52Ē dia x 27Ē wide. They are rated for 1-11 psi max. While not being as tall as the ones on the Sherp they are actually 3 inches wider so they provide a huge footprint when aired down. I had them imported from Russia through Stone Tusk Off Road in Thorsby after being put on to Stone Tusk by a couple members on here in another thread I started when I was originally looking for tires.
Since buying the tires a couple months ago Iíve just been digging up parts and equipment for the build. I bought a 2003 Cavalier with low kilometers. It has the 2.2L Ecotec motor with auto transaxle. I also managed to find a couple Dana 60ís with the front Kingpin model being from an Ď89 Ford 1-ton and the rear from a Ď79 3/4 ton. Different widths but that will be rectified since Iím going to narrow the front by 12 inches and then make the rear to match. On top of that Iíve bought grinders, a cut-off saw, a porta-band saw, a new to me Millermatic 211 mig welder with spool gun, new Optel auto-darkening helmet, engine lift, etc, etc, etc...
The plan is to try and have it done by next summer so that the bugs will be worked out by hunting season. I purposely didnít pull an early season moose draw this year so that Iíll have a tag for next year when the buggy is done. Like I mentioned above, Iíll update the thread as work is done. Iíve been a member on 4x4 Wire and Pirate 4x4 for years and these build threads have always been my favorite. Since I spend most my time on here these days I thought Iíd document the build on here instead of a more conventional 4x4 site since Iím sure there will be a few of you that find it interesting.
Hope you all enjoy,
Positrac
 imagehost imagehost

|

07-20-2018, 11:41 AM
|
 |
|
|
Join Date: Sep 2014
Posts: 509
|
|
Very cool keep us updated
|

07-20-2018, 01:31 PM
|
|
|
|
Join Date: Sep 2012
Posts: 6,439
|
|
Posi, sounds like a interesting project. I lived in Ft Mac for a few years and agree special designed ATV needed for all the swamp, especially east towards Namur lake area.
|

07-20-2018, 01:42 PM
|
 |
Moderator
|
|
Join Date: Feb 2015
Posts: 8,099
|
|
I'm pretty sure you should just cut the fenders on your truck, use an extender, and put them on the 1500. 
|

07-20-2018, 02:54 PM
|
|
|
|
Join Date: Mar 2009
Location: Edmonton
Posts: 9,851
|
|
Cool, I seen the earlier post where you showed this pic. I remember hunting Fox Creek in the 80's with the dads, I was 13 ish. Where all the 4x4's stopped on this old logging road and basically had to wait for freeze up to cross this spot, this lifted, monster tire homemade jeep thing just drove up and rolled through the worst swampy muskeg beaver dam crossing without breaking a sweat. We all knew he had prime big bull areas all to themselves. This was before trikes.
Sounds like your making a sherpa type craft. I look forward to this thread.
|

07-20-2018, 03:30 PM
|
|
|
|
Join Date: Aug 2008
Location: Leslieville
Posts: 2,654
|
|
Great thread and interesting project. How much does each wheel weigh? I think you will struggle to stay under 2500 lbs.
__________________
We talk so much about leaving a better planet to our kids, that we forget to leave better kids to our planet.
Gerry Burnie
|

07-20-2018, 04:54 PM
|
|
|
|
Join Date: Apr 2013
Posts: 3,281
|
|

Quote:
Originally Posted by NCC

Great thread and interesting project. How much does each wheel weigh? I think you will struggle to stay under 2500 lbs.
|
134lb per tire, 60lb per wheel, wheel lock rings (x2) are 15lbs per wheel and hardware is 1lb. For a grand total of 210 per corner all done.
So yes, 2,500lbs dry weight will be tough when you think Iím at 840lbs just in tires/wheels. One of the engineers that I work with calculated all 4 tires would float 6,500lbs fully submerged at 9psi. He tried to explain how he got to that answer but my head started to hurt and then I nodded off...
So floating wonít be a problem but the lighter I can keep it the better it will go in the slop.
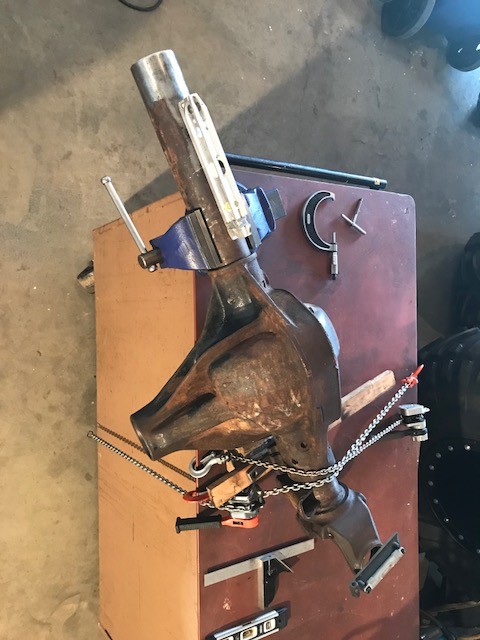
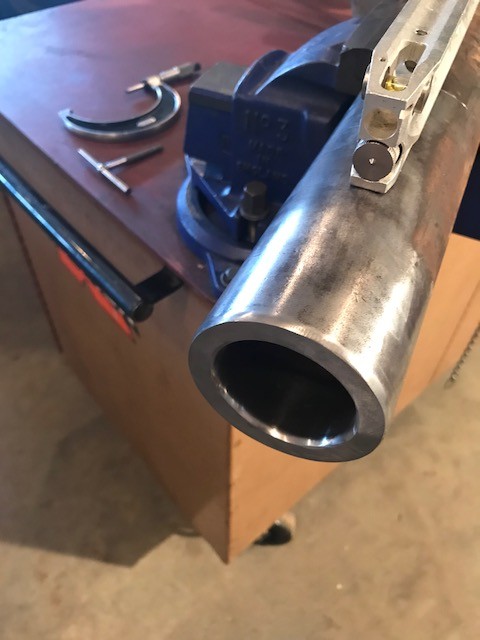
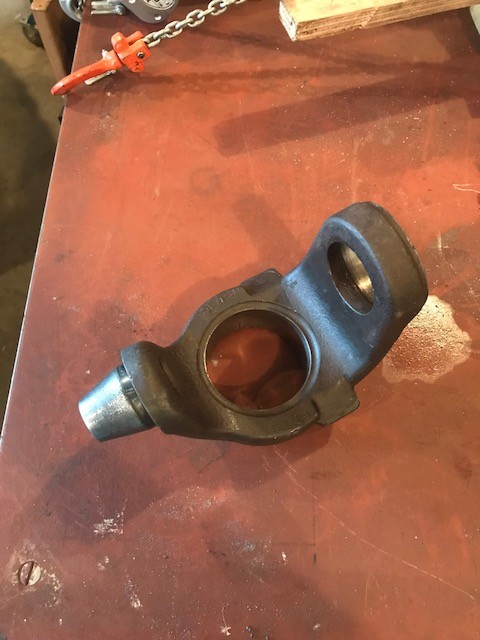
Today it was a little axle prep. I stripped down the front Dana 60 a few weeks back. Today I cut the drivers side knuckle off and then shortened the long side by 14 inches. That should give me an overall width of 96Ē from outside of one tire to the outside of the other. If I had kept the front axle full width at 69 1/4 inches it would have made for a really wide buggy and it would have required a permit to tow it down the highway.
Next I prepped the tube for when the inner knuckle gets put back on. As for the knuckle, I ground the tube weld off then pressed out the old section of tube. A little buff in the bore and itís ready to go back on. Sounds easy when you say it fast but in all it was a good dayís work in the garage...
 share image share image

|

07-20-2018, 11:12 PM
|
|
|
|
Join Date: Aug 2014
Posts: 21
|
|
Iím doing the same thing
Into my second season now, hope to be completed by September
It has been a lot more work then anticipated
Im utilizing a 1985 Suzuki samurai body/frame with Toyota running gear
1.6l
571 gears/ transfer case reduction / spool/ lockers
Etc etc
Same 52Ē tires from Stone Tusk
Wonít be fast but it will float
Good luck with your build
I will be watching the progress
|

07-20-2018, 11:54 PM
|
 |
|
|
Join Date: Jul 2010
Location: Edmonton
Posts: 11,948
|
|
cool thread - keep it going - interesting stuff.
|

07-21-2018, 01:11 AM
|
|
|
|
Join Date: Apr 2013
Posts: 3,281
|
|
Quote:
Originally Posted by Wrong way

Iím doing the same thing
Into my second season now, hope to be completed by September
It has been a lot more work then anticipated
Im utilizing a 1985 Suzuki samurai body/frame with Toyota running gear
1.6l
571 gears/ transfer case reduction / spool/ lockers
Etc etc
Same 52Ē tires from Stone Tusk
Wonít be fast but it will float
Good luck with your buildg
I will be watching the progress
|
Nice of you to chime in Wrong Way. Brent said he sold the tires/wheels off his rock buggy so I wondered who got them.
I thought about building a Aquala Industries aluminum Samurai for a bit but in the end I decided to just build a one-off.
Cheers and good luck with the build.
|

07-21-2018, 01:29 AM
|
 |
|
|
Join Date: May 2007
Location: Calgary
Posts: 11,576
|
|
Dang! This right here has the potential of being one of those very few legendary AO threads...for a GOOD reason! 
Tree
Sent from my iPhone using Tapatalk
|

07-21-2018, 06:20 AM
|
 |
|
|
Join Date: May 2007
Location: Westlock
Posts: 5,564
|
|
Quote:
|
My wife thinks I have a real issue. Truth be told I probably have several issues, Iím just pretty good a hiding most of them from her better than I have this one...
|
You too , eh ! LOL
Cool build & I'll be watching
|

07-21-2018, 09:00 AM
|
 |
|
|
Join Date: Oct 2009
Location: Sherwood Park Ab
Posts: 6,332
|
|
Cool thread. I know the muskeg well up there. Spent 36 years up there and for a few seasons we got away from the old atc trikes as Dad bought an Argo. Itís soft country up there. When I left and moved to Edson in 2003 I was elated how I could drive my Jeep down most cutlines and powerlines unlike the McMurray country I grew up in. Good luck with your build...
__________________
An awful lot of big game was killed with the .30-06 including the big bears before everyone became affluent enough to own a rifle for every species of game they might hunt.
|

07-21-2018, 09:43 AM
|
|
|
|
Join Date: Aug 2014
Posts: 21
|
|
Yes thatís me
I have Brentís original set of tires.
We had planned to go skeggin together
So far Iím a year late
Lol
One day it will happen
hopefully we can all get out when your build is complete.
The body on mine was a rusted out mess, it has swallowed a lot of my time patching.
Would have been further along with a scratch build.
Thinking on purchasing a tubing bender to build an exo cage for it but they sure are pricey. Any suggestions?
|

07-21-2018, 04:37 PM
|
|
|
|
Join Date: Apr 2013
Posts: 3,281
|
|
Iím not sure about the tubing bender Wrong Way. I thought about one of those cheap benders based on a bottle jack and some dies, but Iíve heard they crush the tube a bit so that wouldnít look all that great. For 300 bucks or so they may be worth a try though.
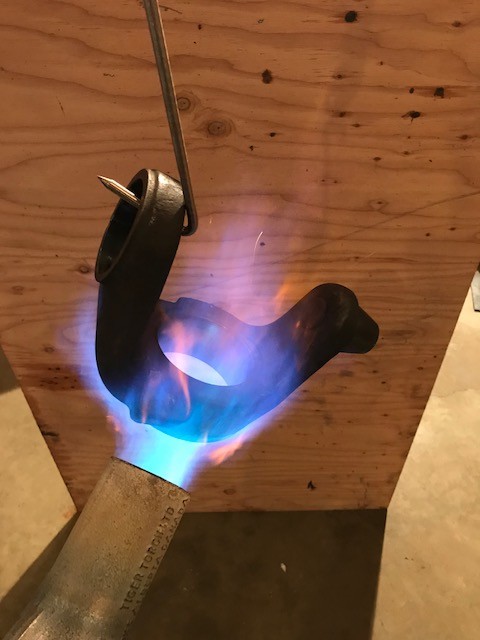
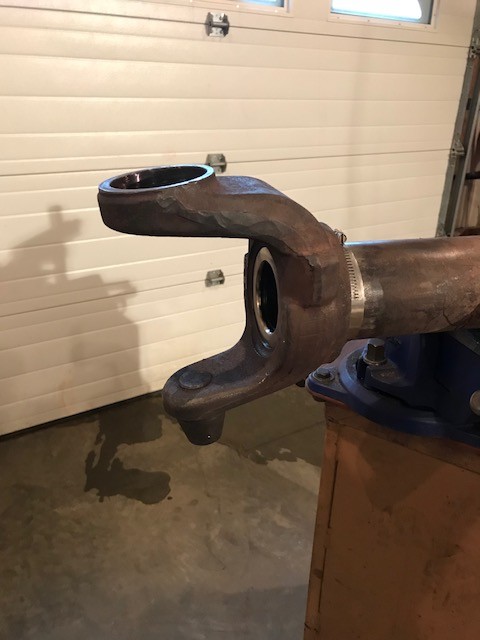
Some torrential rain here today with lightning and thunder like I havenít seen/heard in a while. I did manage to heat the inner C up and install it on the front D60. Even managed to get it in the same plane as the drivers side inner C. The original fit was .0025 interference. After cleaning the tube up and bore of the inner C Iím about a thou less. Plenty as Iím planning on welding both sides of the Cís.
 upload host upload host
 screenshot tool screenshot tool
|

07-24-2018, 11:00 AM
|
|
|
|
Join Date: Apr 2013
Posts: 3,281
|
|
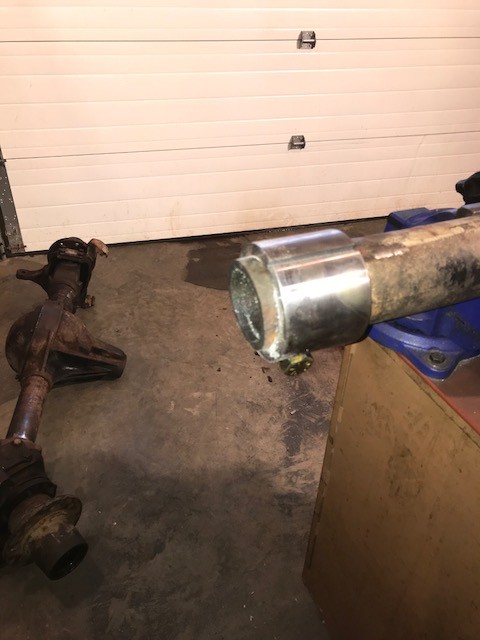
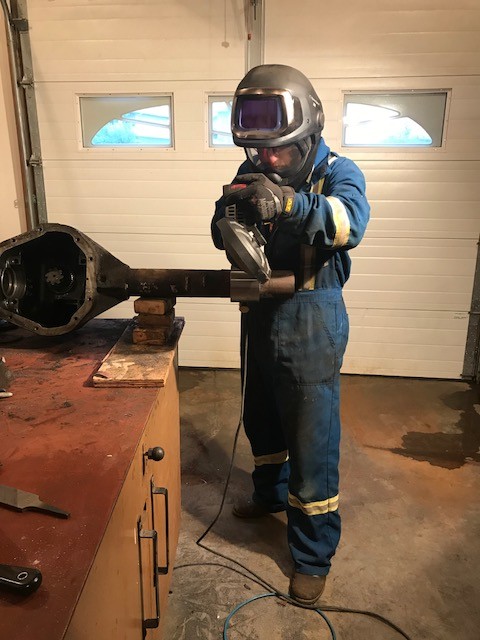
Tube cutting time on the rear Dana 60. I put the front 60 all back together with the old bearings so that I could get an accurate wheel mounting surface to WMS measurement. It came out at 54 3/4Ē on the nose, 14 1/2Ē less than the stock 69 1/4Ē. Narrower than the smallest Toyota mini truck axle ever made but there will be 20 inches of tire out each side with the wheel backspacing added in so in the end it will still be a wide rig.
The diff in the rear went back in and the hubs got mounted on the new spindles. After a bunch of measuring and head scratching I had the tube lengths figured out so that Iíd end up with the same WMS to WMS as the front 60. I had the spindles made with a shoulder so that they couldnít be slid in too far. I also had a couple clamps made to help in cutting the tubes straight. The portaband did a nice job of cutting the axles but a cut-off disk in a grinder would have worked too.
 free image hosting website free image hosting website
|

07-24-2018, 09:50 PM
|
|
|
|
Join Date: Apr 2013
Posts: 3,281
|
|
|

07-24-2018, 10:20 PM
|
 |
|
|
Join Date: Sep 2007
Location: Sibbald Flats
Posts: 1,154
|
|
Awesome build and thread, like many others I will be following this. Thanks for sharing
|

07-25-2018, 12:38 AM
|
|
|
|
Join Date: Sep 2011
Location: calgary
Posts: 190
|
|
What a great thread you have a new follower
|

08-02-2018, 01:19 PM
|
|
|
|
Join Date: Aug 2017
Location: Edmonton
Posts: 294
|
|
https://youtu.be/RNtZb4vWNLA
Someone entered a sherp into a bounty hole competition and just destroyed everyone, pretty cool to watch how these things just float through that kind of mud hole. Thought the op might like to see.
Skip to around the 7:40 mark to see the sherp.
__________________
I am unique! Just like everybody else.
|

08-02-2018, 03:05 PM
|
|
|
|
Join Date: Apr 2013
Posts: 3,281
|
|

Quote:
Originally Posted by ChickakooKookoo

https://youtu.be/RNtZb4vWNLA
Someone entered a sherp into a bounty hole competition and just destroyed everyone, pretty cool to watch how these things just float through that kind of mud hole. Thought the op might like to see.
Skip to around the 7:40 mark to see the sherp.
|
Thanks for the vid Chickakoo. Thatís Ostacruiser from Youtube fame in the video. He bought the Sherp close to a year ago and has been pounding out the vids ever since. He does a really good job of filming all his adventures. And youíre right, he owned that mud hole.
Iíve been out in a Sherp myself and while they are very capable their drivetrain is anything but simple and parts are super expensive. Get 300 hours on them and Iíd bet dollars to donuts they will keep you broke keeping up on maintenance and repairs. Just think very expensive Argo...
But, they are cool and like Iíve said before if you can afford the $140,000 price tag all done up you probably donít need to worry about maintenance costs... Alas, they are way outside my budget.
Iím not claiming my buggy will be as capable as a Sherp, because it wonít be, but Iíll build it for not much more than the price of a good SXS and it will handle going most the places I need to up here. Plus, parts will be simple and available at any auto parts store.
I picked up the rectangular 3Ēx1 1/2Ē - 3/16Ē wall tubing for the frame today. Unfortunately Iím doing the timing belt/water pump and brakes in my wifeís Pilot over the next few days so progress on the buggy will be slow these days off. I did hear though that my custom length Dutchman axle shafts were being shipped today so thatís exciting.

|

08-07-2018, 11:34 AM
|
|
|
|
Join Date: Aug 2015
Posts: 127
|
|
sub'd!
|

08-07-2018, 08:39 PM
|
 |
|
|
Join Date: Mar 2008
Posts: 2,073
|
|
Good thread but....If you could please put in a few longer days/nights to increase production and lower the suspense that would be great. Pretty sure most of the views are just a few of us who keep checking back for more updates.
I know, quality work takes time and time can be hard to find.
Great work! keep the thread going.
|

08-07-2018, 10:03 PM
|
|
|
|
Join Date: Apr 2013
Posts: 3,281
|
|
Sorry to disappoint the half dozen of you guys following the build...lol.
Life gets in the way of buggy building for sure and the next month will be slow with work and a family vacation thrown in.
I did find a bit of time these days off to work on the frame design but not a lot to show there...
|

08-07-2018, 11:10 PM
|
|
|
|
Join Date: Nov 2014
Posts: 2,046
|
|
Iím sure thereís more than a half dozen guys watching Positrac. Iím quite envious of your project and am following along for sure. Thereíll be a lot of labour but the end result should be very worth it!
|

08-08-2018, 10:49 AM
|
 |
|
|
Join Date: Mar 2008
Posts: 2,073
|
|
Quote:
Originally Posted by Positrac

Sorry to disappoint the half dozen of you guys following the build...lol.
Life gets in the way of buggy building for sure and the next month will be slow with work and a family vacation thrown in.
I did find a bit of time these days off to work on the frame design but not a lot to show there...
|
Was just giving you are hard time. I canít say much since Iíve been 2 months just stripping the interior on my car and Iím half done.
Looking forward to more posts down the road.
|

08-08-2018, 01:01 PM
|
 |
|
|
Join Date: Jun 2008
Posts: 10,303
|
|
Quote:
Originally Posted by buckbrush

Good thread but....If you could please put in a few longer days/nights to increase production and lower the suspense that would be great. Pretty sure most of the views are just a few of us who keep checking back for more updates.
I know, quality work takes time and time can be hard to find.
Great work! keep the thread going.
|
Agreed!
And just have to say that Positrac's sig line did make me laugh.
|

08-08-2018, 01:50 PM
|
 |
|
|
Join Date: Oct 2010
Location: central Alberta
Posts: 12,630
|
|
Interesting build. Hope it all works with no bugs.
I am not being negative but merely wondering... I believe there is a law in Alberta where your tires cannot extend out further than 4 inches past the fender well to be street legal. Any truth to this? How far out will your wheels go beyond the fender?
__________________
___________________________________________
This country was started by voyagers whose young lives were swept away by the currents of the rivers for ten cents a day... just for the vanity of the European's beaver hats. ~ Red Bullets
___________________________________________
It is when you walk alone in nature that you discover your strengths and weaknesses. ~ Red Bullets
|

08-08-2018, 02:53 PM
|
|
|
|
Join Date: Apr 2013
Posts: 3,281
|
|
I have no idea Red Bullets on the legal requirements when it comes to tires/fenders for driving on the street. I only leaned the tires up against my truck to show how big they are compared to a 3/4 ton Powerwagon on 35ís. This buggy is strictly for off-road use only and the tires are not street legal.
I did however narrow the Dana 60ís so that the overall width was legal for towing down the highway without a permit. If I remember right the maximum width without a permit is 8í6Ē and the buggy will be sitting just under 8í in width at the widest (tires) point.
|

08-08-2018, 04:22 PM
|
 |
|
|
Join Date: Oct 2011
Location: Edmonton
Posts: 1,248
|
|
Quote:
Originally Posted by Positrac

I have no idea Red Bullets on the legal requirements when it comes to tires/fenders for driving on the street. I only leaned the tires up against my truck to show how big they are compared to a 3/4 ton Powerwagon on 35ís. This buggy is strictly for off-road use only and the tires are not street legal.
I did however narrow the Dana 60ís so that the overall width was legal for towing down the highway without a permit. If I remember right the maximum width without a permit is 8í6Ē and the buggy will be sitting just under 8í in width at the widest (tires) point.
|
That's probably just one of many details at the end of the project you need to plan for at the beginning! Good luck with the rest of the build!!
__________________
Long gone are the times when things were made of wood, and men made of steel.
author unknown
|
 Posting Rules
|
You may not post new threads
You may not post replies
You may not post attachments
You may not edit your posts
HTML code is Off
|
|
|
All times are GMT -6. The time now is 12:58 PM.
|